
Continuous Integration in Windows Applications using the WiX toolset
Note: Shout out to my colleague Nolan Egly for all his help getting me to understand WiX.
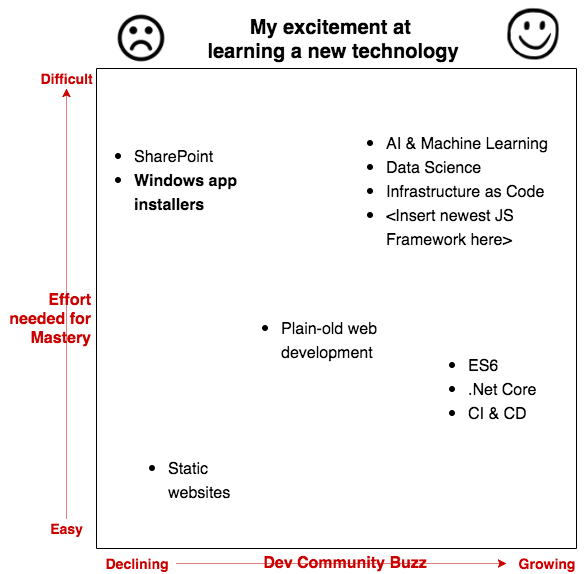
As software consultants we get to ride the wave of new technologies - learning new things, moving from project to project, staying on the bleeding edge, right?
Not always.
Every now and then, a client project throws you a double-whammy: something hard to learn and with no prospects of long-term usefulness. Such projects test the consultant’s mettle. Do you say “screw this, I’m not working on outdated stuff,” or do you grit your teeth and get the job done?
This post is about one such project: implementing a Continuous Delivery process for a Windows app. Hopefully you (or I) never have to do this ever… but if you do, hope this helps!
The Challenge
Recently I was helping a client with a mission-critical Windows Forms application. They were interested in incorporating CI, build automation and other best practices… but I had never done this for a Windows application before.
The existing dev team was deploying manually using ClickOnce. Developers published new builds from their machines using Visual Studio (Build > Publish > follow the wizard), copy-pasted the output to a shared network drive, from where users would download or update the app. The IT Ops organization wanted to use Windows Installers (.msi) instead of ClickOnce so that they could enforce group policies on the app. I also wanted to introduce a Continuous Delivery model; with code changes being immediately and automatically deployed to a test environment.
So the challenges for me to figure out:
- How do you create a Windows Installer package automatically?
- How do you incorporate it into a CI process?
- How do you make it easy for developers to incorporate into their daily process?
Choosing a toolkit: WiX or Squirrel?
For those who don’t know: Microsoft’s Windows Installer installs apps in a specific way on Windows machines: it makes sure you can always uninstall/repair the app from the Program Files Unistall menu, adds desktops and/or Start Menu shortcuts, adds registry keys, allows corporate group policies to be enforced, etc.
Researching the available tools to create Windows Installer packages (.msi or .exe), I found 2 main contenders: the WiX Toolset and Squirrel.
My original inclination was to try Squirrel. It’s made by Github, it deals in nuget packages (something I know how to work with in a CI/CD pipeline), and it seemed like the new hotness. Even their tagline is “Squirrel: It’s like ClickOnce but Works” - which is the kind of tongue-in-cheek confidence I like.
WiX, on the other hand, seemed like clunky old XML-based technology from the last decade. I didn’t understand it, it felt unfamiliar, and so I didn’t wanna touch it.
In retrospect, that was superficial bias. WiX is a powerful, proven and widely used toolset, and has a lot of community activity. It was a steep learning curve though. I spent 2-3 weeks learning the tool through trial and error; and then it took just 2-3 days to implement everything. Next time around I wouldn’t mind giving Squirrel a go to see if the learning curve is shorter.
Identifying goals and milestones
When learning something new under time pressure, it really helps to write down 2 things: a set of goals (“what am I trying to achieve?”) and a set of milestones (“what small steps will get me there?”). Here’s what I wrote down for this process:
Goals:
- Automate everything: one-click creation of the installer from scratch
- Command-line tools only: necessary for any Continuous Delivery pipeline
- Dynamic build: require little to no changes to the process as the underlying solution evolves
Milestones:
- Build the project from the command line
- Create an .msi installer containing the output from step 1
- Add a desktop shortcut
- Add a start menu shortcut
- Add icon(s)
- Run database migration during the install/update process
- Include other dependencies required for the installation (.Net Framework, SQL Server, etc.)
How WiX Works
Creating an installer using the WiX toolset comprises only 3 fundamental steps:
- Create one or more config (.wxs) files - this specifies all the files to include in the installer, custom actions to perform, shortcuts to create, icons to use, etc.
- Compile each .wxs file into a .wixobj object
- Link all the .wixobj objects together into the .msi installer package
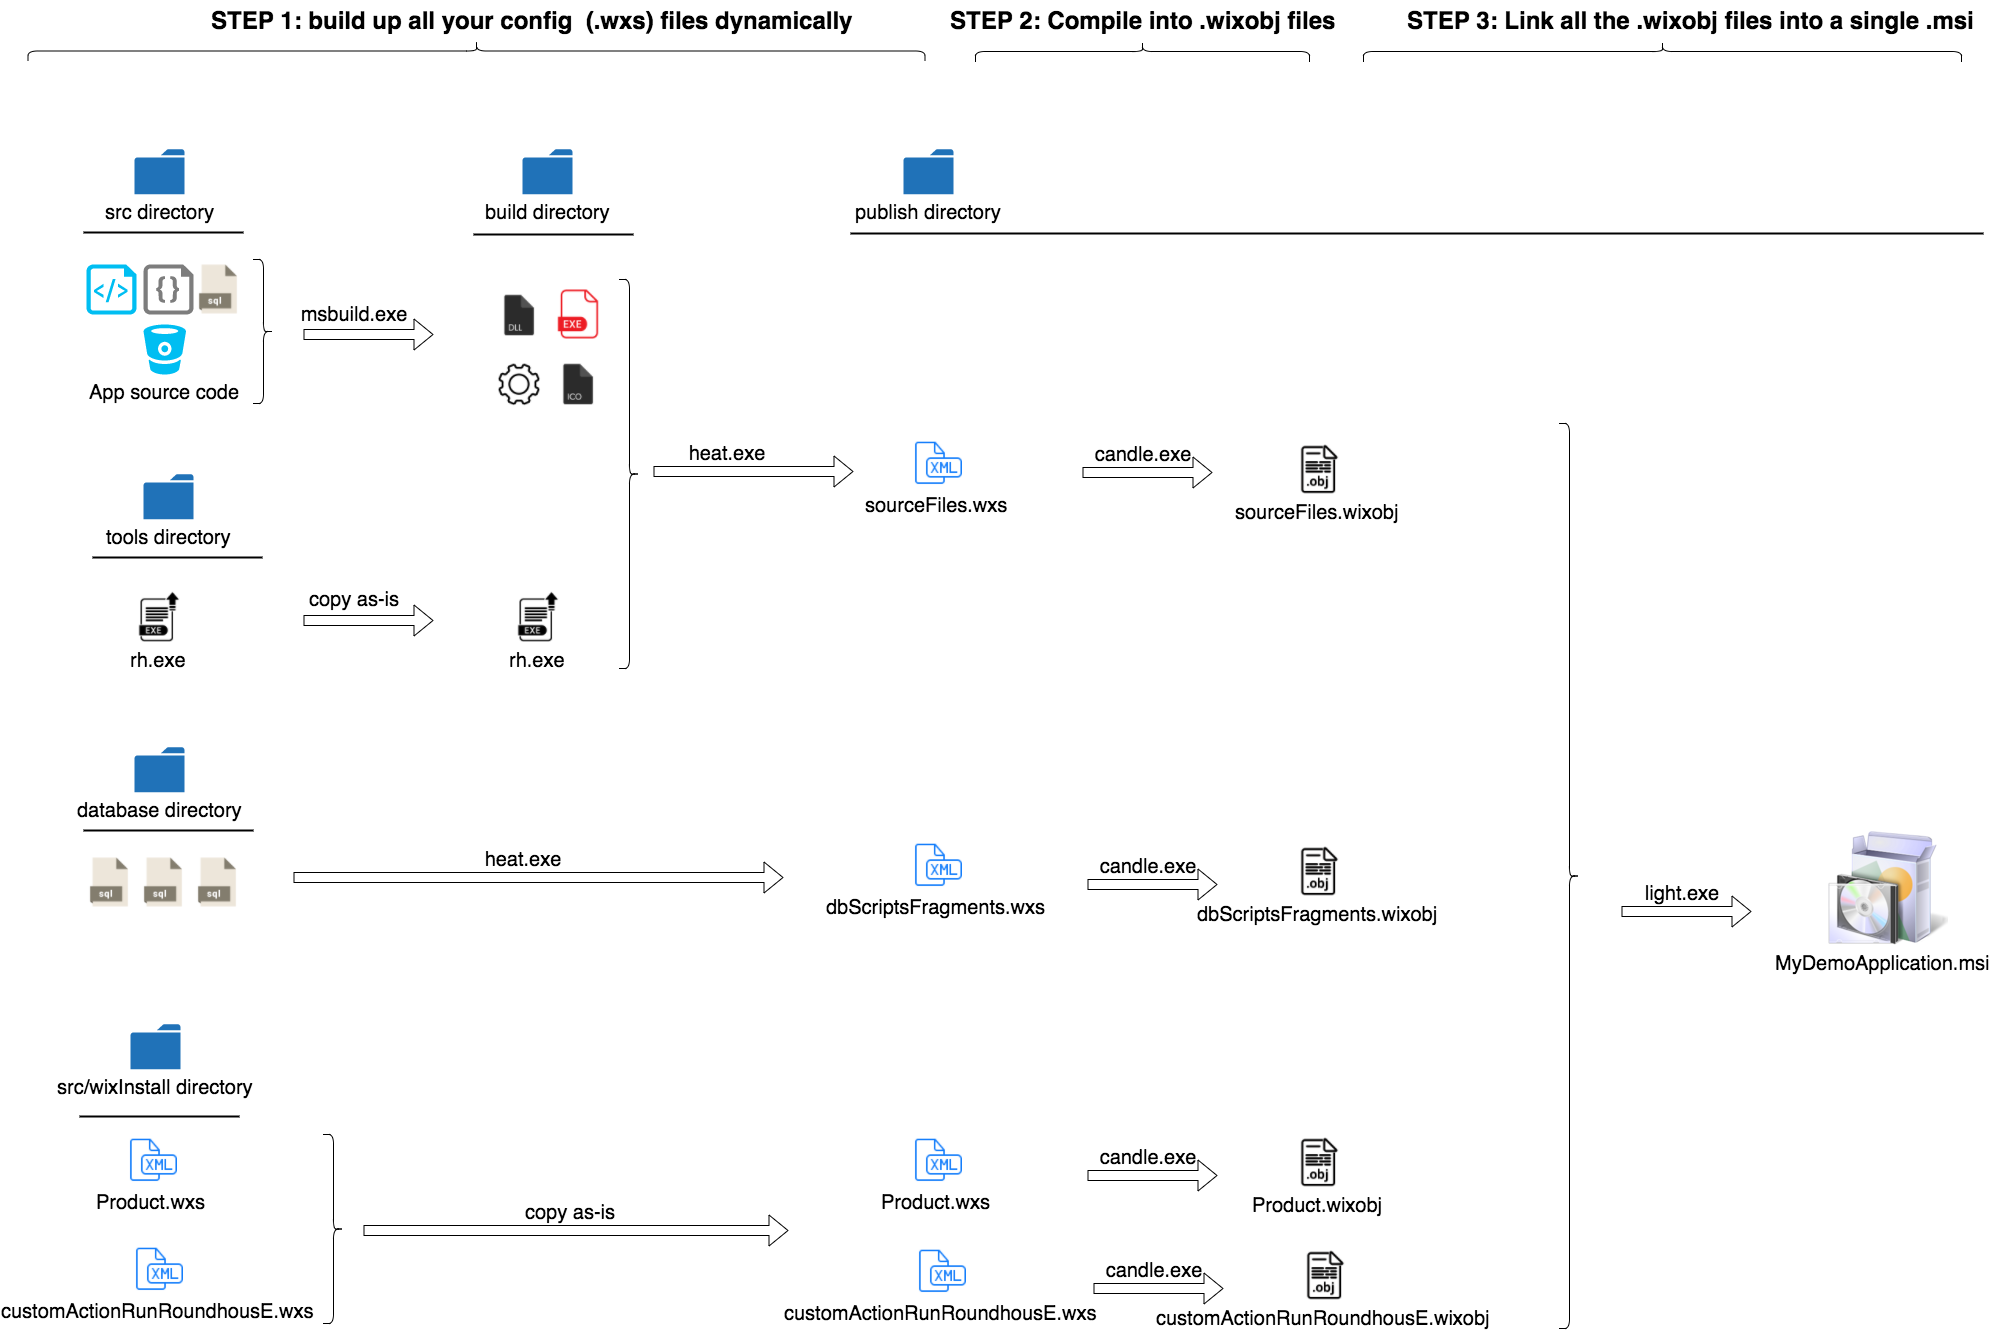
The complexity, of course, lies in how you automate everything. We’ll dive into each step, but here’s the entire process in a nutshell:
Prerequisites: a strong foundation
One advantage I started with was a great set of command-line tools to handle the low-level stuff. My company Headspring has a strong focus on good development practices, so I was already familiar with some of the tools I’d need:
- psake for build automation tasks (similar to rake or make, but with PowerShell)
- RoundhousE for database migrations
(Note: intros to psake and RoundhousE are out of scope for this article)
By the end of Iteration 0, I already had a build.bat file with various psake tasks I could invoke from the command line, for intance:
- build: (default) run the initial task to build the application, restore nuget packages, create & update the database and run all the tests
- build ci: run a CI build task that does all the above, but in Release configuration
- build rdb: rebuild all databases
- build upd: update all databases
- build tests: run all tests
I also had a nice clean directory structure for the code base:
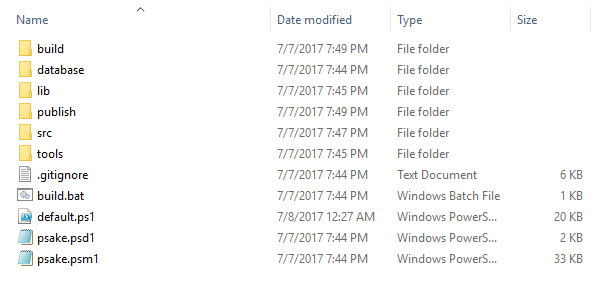
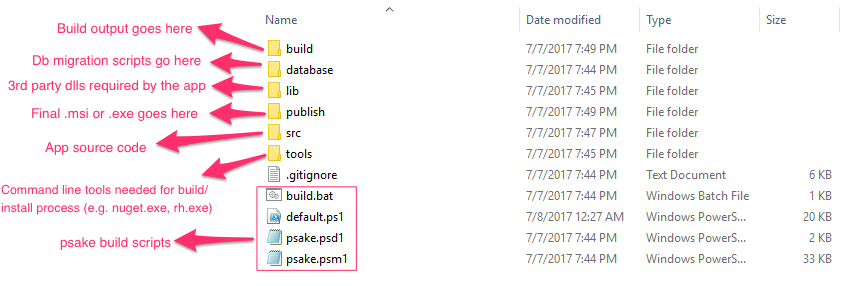
So I already had a strong foundation. All I needed was to plug my tasks into this existing architecture. I decided to create 2 new psake tasks:
- build msi: creates an .msi package that includes the output of msbuild
- build bundle: creates an .exe package that includes the .msi and all its external dependencies
Note: the WiX documentation has a little helper post about other ways to include WiX into a daily build, but I preferred the toolset above.
Step 1. Build the executables from the command line
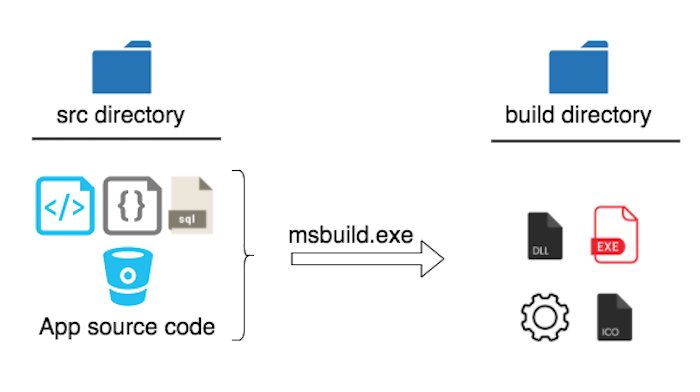
My ci task does 3 things:
- Sets the build configuration to Release
- Cleans the build and publish directories, as well as runs msbuild clean on the solution
- Compiles the solution using msbuild and puts the results in the build directory
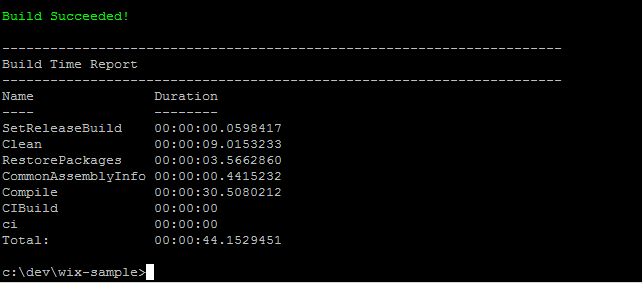
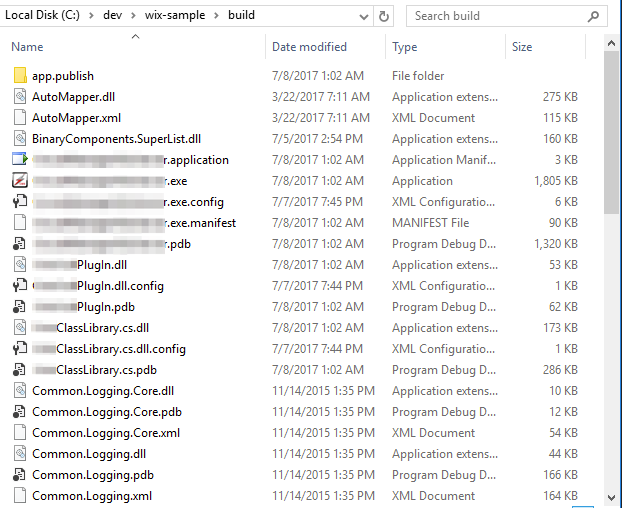
Now, when I call “build ci” I expect the build to succeed; and the build directory to be populated with the application executables:

Step 2. Create an .msi installer containing everything in the build directory
We now take all the files generated in the build directory (Step 1) and package them into an .msi installer. This is where we will start using the WiX toolset.
Firstly, I downloaded the WiX binaries and added them to the code base under the tools\wix\311 folder. This way your build server (or other dev machines) don’t need WiX pre-installed. Standard practice.
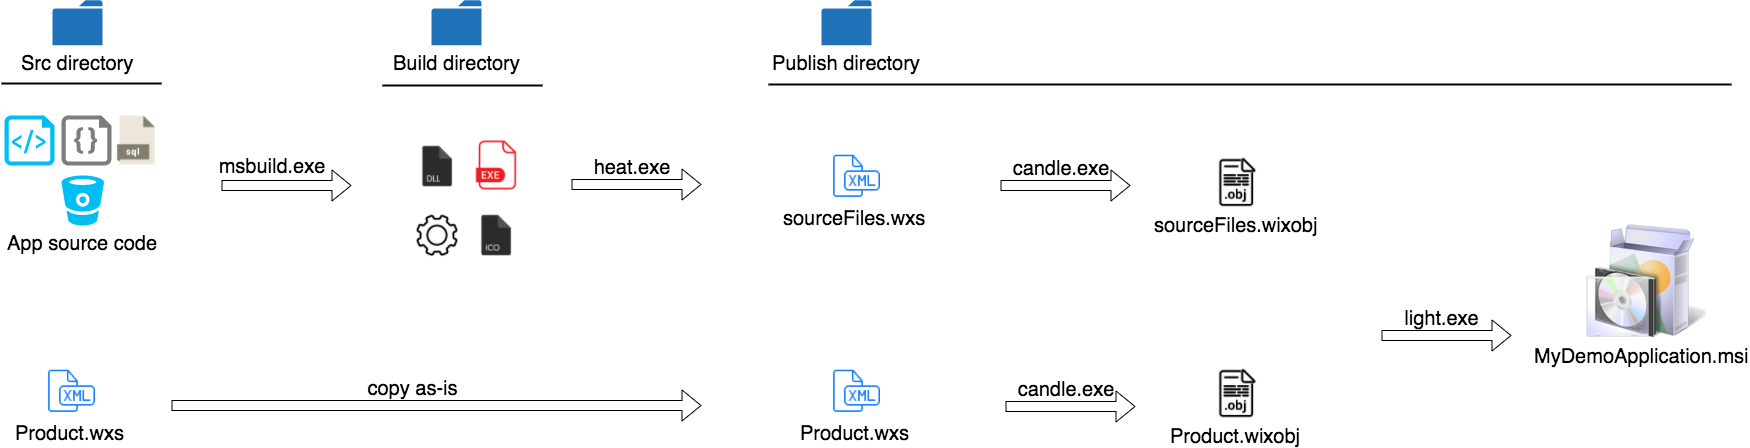
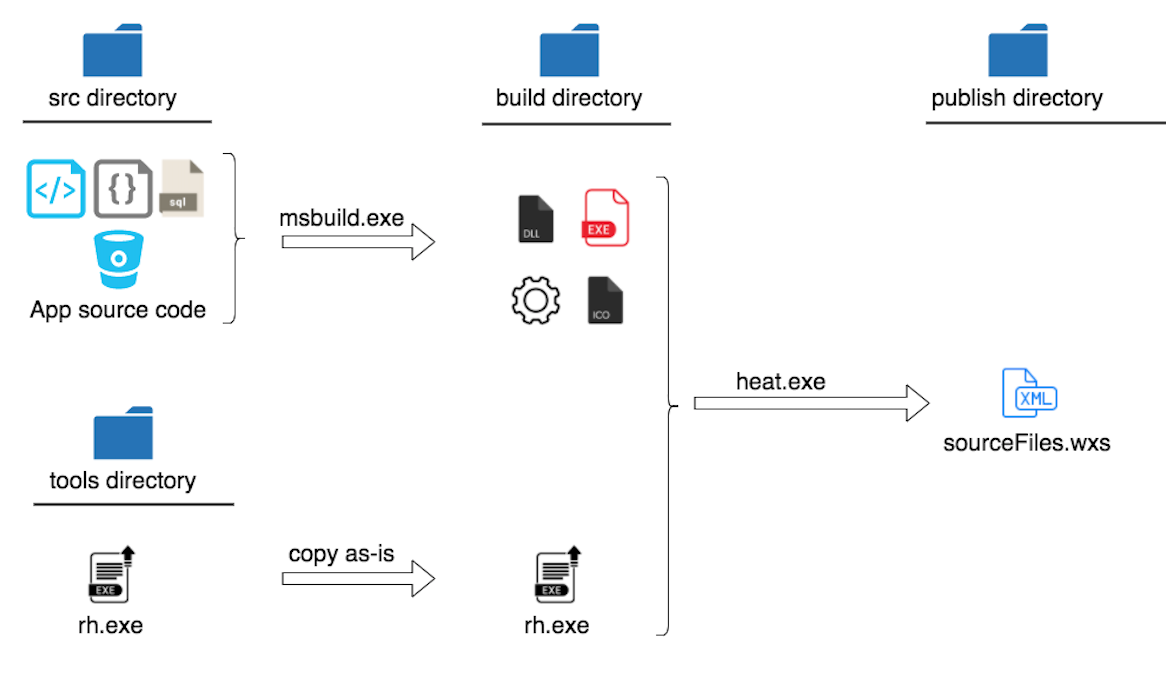
As shown in the picture above, creating the .msi using WiX is a 4-part process:
- Create a static WiX config file (Product.wxs) - this is where you will define the package’s most important attributes: name, publisher, version, etc. and begin to define the components of the package.
- Using the heat.exe tool, harvest all the contents of the build directory into a dynamic WiX config file (sourceFiles.wxs)
- Using the candle.exe tool, compile each .wxs file into .wixobj files
- Using the light.exe tool, link all the .wixobj files into a single .msi executable
Here’s what the final psake task CreateMsiPackage looks like; an explanation of each piece follows below.
Harvesting the contents of the build directory is easy; I just used the heat.exe tool (line 6 above):
exec { &"$wix_dir\heat.exe" dir "$build_dir" -dr INSTALLFOLDER -ag **-cg DynamicFragment** -ke -srd -sfrag -nologo -pog:Binaries -pog:Documents -pog: Satellites -pog:Sources -pog:Content -out "$publish_dir\sourceFiles.wxs" }
Note the parameter “-cg DynamicFragment” here: this is important because it nests everything inside a fragment with an Id of “DynamicFragment”. We will later reference this Id from the Product.wxs file to link everything together.
Next, let’s work on the most important piece: the Product.wxs file. This file’s config determines what the final outcome looks like on the user’s machine.
To start creating the Product.wxs file, I just used the WiX toolset for Visual Studio. Install it, then use Visual Studio to create a new WiX Setup project (File > New Project > Wix > Setup project.)
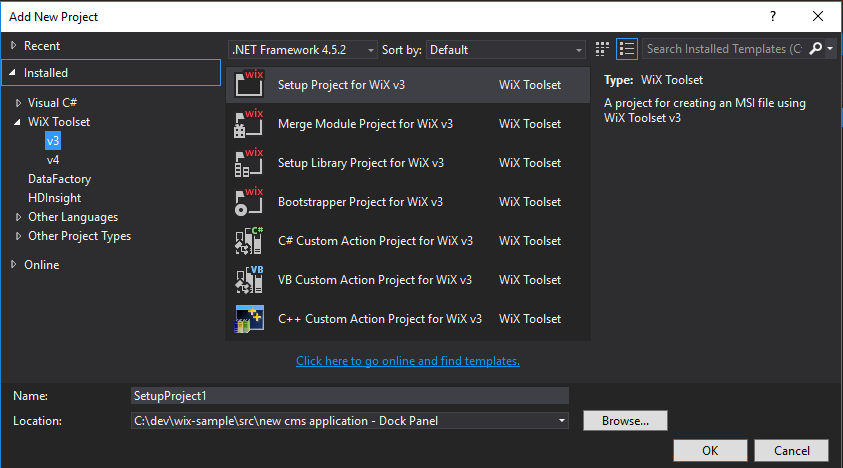
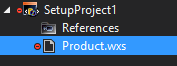
This creates a default Product.wxs template:
Let’s fill in some of the details by hand. To start off, enter the name, version and other basic information about your product. Also decide your targeted directory structure (i.e. how things will be installed on the user’s machine):
One of the nice things about WiX is that it’s modular: you can define things in separate fragments, and then bring them all together using ID references. The key things to notice in the file above:
- Product IDs, upgrade codes etc. are GUIDs - and these MUST be capitalized because Windows Installer demands it. The unique GUIDs are how Windows Installer tracks what to install/uninstall/repair on the user’s machine.
- What’s under the TARGETDIR directory node is what determines the app’s directory structure on the user’s machine. Here I’ve chosen to place my app under Program Files > VishalCorp > My Demo Application (lines 25-30). Windows Installer will create the corresponding folders on the user’s machine.
- The component(s) inside the Feature node determines what is included in the .msi package. Right now there is only 1 thing inside the Feature node (lines 18-20): a ComponentGroupRef - i.e. a reference to a ComponentGroup that has the Id of “ProductComponents.”
- Note how the ComponentGroup (with Id=”ProductComponents”) is defined in a different fragment on line 35, and how it maps to the INSTALLFOLDER directory. That means, anything listed here will be installed straight into the INSTALLFOLDER directory defined above in line 28.
- Components and componentGroups can be nested. Here I’ve put a ComponentGroupRef called “DynamicFragment” (line 36) inside the main “ProductComponents” group. Why? Because it’s a reference to the contents of the sourceFile.wxs file we created earlier. The fragment Id used here (“DynamicFragment”) will match the Id used to generate the other file.
To summarize:
- The Product.wxs file defines the product’s name, version, directory structure and location, etc.
- The Product.wxs file can include references to components/componentgroups in other .wxs files. We’ve added a reference to a componentgroup we’re calling DynamicFragment (you can call it anything you want, really; it doesn’t matter as long as the IDs match.)
- The DynamicFragment componentgroup is defined inside another .wxs file, which is auto-generated using the heat.exe tool to include all the files inside the Build directory. This way, as your solution evolves, you don’t need to update your .wxs files; they’re auto-included for you.
Step 3: Add a desktop shortcut
Next step in the evolution of our installer is to make it add a desktop shortcut. This will be done with just a few changes to our Product.wxs file.
This is a 3 step process:
- Add a component DesktopShortcut under the Feature node (line 20 in Product.wxs gist below)
<Feature Id="ProductFeature" Title="MyDemoAppInstaller" Level="1"> <ComponentGroupRef Id="ProductComponents" /> <ComponentRef Id="DesktopShortcut" /> </Feature> - Add a reference to the DesktopFolder directory (line 33 in Product.wxs gist below)
<!-- desktop shortcut --> <Directory Id="DesktopFolder" Name="Desktop"> </Directory> - Create a component fragment for the shortcut to go into the Desktop folder (lines 45-59 in Product.wxs gist below)
 <!-- desktop shortcut component-->
 <Fragment>
   <DirectoryRef Id="DesktopFolder">
     <Component Id="DesktopShortcut" Guid="*">
         <Shortcut Id="ApplicationDesktopShortcut"
             Name="My Demo Application"
             Description="Description of My Demo Application"
             Target="[INSTALLFOLDER]MyApplication.exe"
             WorkingDirectory="INSTALLFOLDER" />
         <RemoveFolder Id="DesktopFolder" On="uninstall"/>
         <RegistryValue Root="HKCU" Key="Software\VishalCorp\[ProductName]"
             Name="desktopshortcutinstalled" Type="integer" Value="1" KeyPath="yes"/>
     </Component>
   </DirectoryRef>
 </Fragment>
The complete Product.wxs file at the end of this step looks like this:
Step 4: Add a Start Menu shortcut
Same as above; just a few changes to our Product.wxs file will create the start menu shortcut.
3 steps (see the updated Product.wxs file below):
- Add a component under the Feature node (line 20)
<Feature Id="ProductFeature" Title="MyDemoAppInstaller" Level="1"> <ComponentGroupRef Id="ProductComponents" /> <ComponentRef Id="ApplicationShortcut" /> <ComponentRef Id="DesktopShortcut" /> </Feature> - Add a directory under the ProgramMenuFolder > ApplicationProgramsFolder directory structure (lines 33-37)
<!-- start menu shortcut --> <Directory Id="ProgramMenuFolder"> <Directory Id="ApplicationProgramsFolder" Name="VishalCorp"> </Directory> </Directory> - create the component fragment & add the shortcut under the component fragment (lines 67-80)
 <!-- start menu shortcut component-->
 <Fragment>
   <DirectoryRef Id="ApplicationProgramsFolder">
     <Component Id="ApplicationShortcut" Guid="*">
         <Shortcut Id="StartMenuShortcut"
           Name="My Demo App"
           Target="[INSTALLFOLDER]MyApplication.exe"
           WorkingDirectory="INSTALLFOLDER" />
         <RemoveFolder Id="CleanupShortcut" Directory="ApplicationProgramsFolder" On="uninstall" />
         <RegistryValue Root="HKCU" Key="Software\VishalCorp\[ProductName]"
           Name="startmenushortcutinstalled" Type="integer" Value="1" KeyPath="yes" />
     </Component>
     </DirectoryRef>
 </Fragment>
The complete Product.wxs file at the end of this step looks like this:
Step 5: Add Custom Icons
You can select different icons for each of these things:
- the desktop shortcut
- the start menu shortcut
- the line item in the Add/Remove Programs menu
I have a 3-step process to configure which icons to use:
- Copy all the .ico files you want into the build directory, so that the heat.exe tool includes them in the package.
- To do this, I modified my CreateMsiPackage psake task to execute a file copy:
 task CreateMsiPackage -depends CIBuild {
   # copy all static files we need into the build directory
   # note: the application files (dynamic) are already in the build directory thanks to the CIBuild task
   exec { cp "$source_dir\My_Icon_1.ico" "$build_dir\My_Icon_1.ico" }
   exec { cp "$source_dir\My_Icon_2.ico" "$build_dir\My_Icon_2.ico" }
- To do this, I modified my CreateMsiPackage psake task to execute a file copy:
- Define the icon files in our Product.wxs file anywhere inside the Product tag:
<!-- References to 1 or more icons to be used across the installations --> <Icon Id="icon1.ico" SourceFile="SourceDir\My_Icon_1.ico" /> <Icon Id="icon2.ico" SourceFile="SourceDir\My_Icon_2.ico" /> - Finally, assign an icon to each shortcut in the Product.wxs file (lines 29, 67 and 83 in the Product.wxs gist below.) Note that the Add/Remove Program Files icon has a special property Id called ARPPRODUCTICON.
The Product.wxs file at the end of this step looks like this:
Step 6. Run a database migration task during install/update
Now it gets interesting! We want to run a database migration task when the app is installed or upgraded, so that the user’s local database is kept up to date.
As mentioned earlier, the db migration tool I used is called RoundhousE; it’s just a single executable rh.exe that executes a bunch of .sql scripts against a db connection string. We need to get the rh.exe file, as well as all the .sql scripts, included in our installer. Then we need to tell our installer to run the rh.exe command on the user’s machine during installation.
The good news is that Windows Installer allows you to run executables as part of the installation process. In WiX terms, this is called a CustomAction. For the sake of easy maintenance let’s define the CustomAction in a separate file. I’ll name it customActionRunRoundhousE.wxs, and here’s how it looks:
The CustomAction properties are pretty self explanatory… but most important is ExeCommand. It’s the command you’d normally execute via the console. Notice that it’s just a call to the rh.exe tool with a bunch of additional parameters.
(Note: one TODO that I couldn’t get to: make the database connection string a variable passed in via the psake task.)
So to achieve our goal, we need to accomplish a bunch of things:
- Copy the rh.exe file to the user’s machine
-
To do this, I copy the rh.exe file into the build directory (see line 6 in the default.ps1 gist below). This way, it gets harvested up into sourceFiles.wxs along with all the other files there.
exec { cp "$roundhouse_exe_path" "$build_dir\rh.exe" }
-
- Create a subdirectory on the user’s machine to store all the .sql files - let’s name it DbScriptsFolder.
-
This is done inside Product.wxs with a simple change to the directory structure (see line 40 in the Product.wxs gist below.)
  <Directory Id="INSTALLFOLDER" Name="My Demo Application">
      <Directory Id="DbScriptsFolder" Name="DbScripts" />
  </Directory>
-
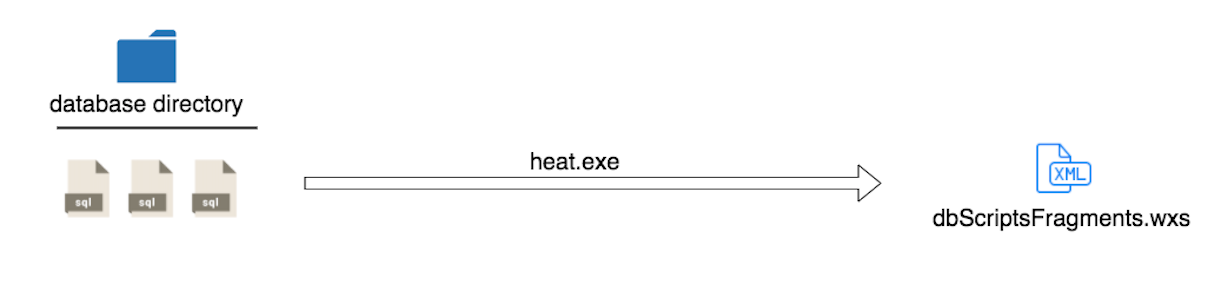
- Copy all the db migration .sql files to the user’s machine
- Use heat.exe to harvest the contents of the database folder into a new .wxs file we’re calling dbScriptsFragments.wxs (line 12 in the default.ps1 gist below)
-
Note that it is configured to put everything inside the “DbScriptsFolder” directory on the user’s machine.
exec { &"$wix_dir\heat.exe" dir "$db_scripts_dir" -dr DbScriptsFolder -var var.DbScriptsDir -ag -cg DbScriptsFragment -ke -srd -sfrag -nologo -pog:Binaries -pog:Documents -pog: Satellites -pog:Sources -pog:Content -out "$publish_dir\dbScriptsFragments.wxs" }
-
Add all these database-related components into your Feature inside the main Product.wxs file (see line 22, as well as lines 62-70, in the Product.wxs gist below.)
<Feature Id="ProductFeature" Title="MyDemoAppInstaller" Level="1"> <ComponentGroupRef Id="ProductComponents" /> <ComponentRef Id="ApplicationShortcut" /> <ComponentRef Id="DesktopShortcut" /> <ComponentGroupRef Id="DbScriptsComponents" /> </Feature> <!-- db scripts component group --> <Fragment> <ComponentGroup Id="DbScriptsComponents" Directory="DbScriptsFolder"> <ComponentGroupRef Id="DbScriptsFragment" /> <Component Id="rh.exe" Guid="*"> <File Id="rh.exe" Source="SourceDir\rh.exe" KeyPath="yes" Checksum="yes"/> </Component> </ComponentGroup> </Fragment> - Include the new customActionRunRoundhousE.wxs file that contains the CustomAction to run roundhouse.
-
Similar to the Product.wxs file, I’m taking this file as-is and copying it over to the Publish directory. This is done inside the CreateMsiPackage psake task (line 10 in the 6_2_default.ps1 gist below.)
exec { cp "$cms_installer_path\customActionRunRoundhousE.wxs" "$publish_dir\customActionRunRoundhousE.wxs" }

-
The completed versions of default.ps1 and Product.wxs are listed below:
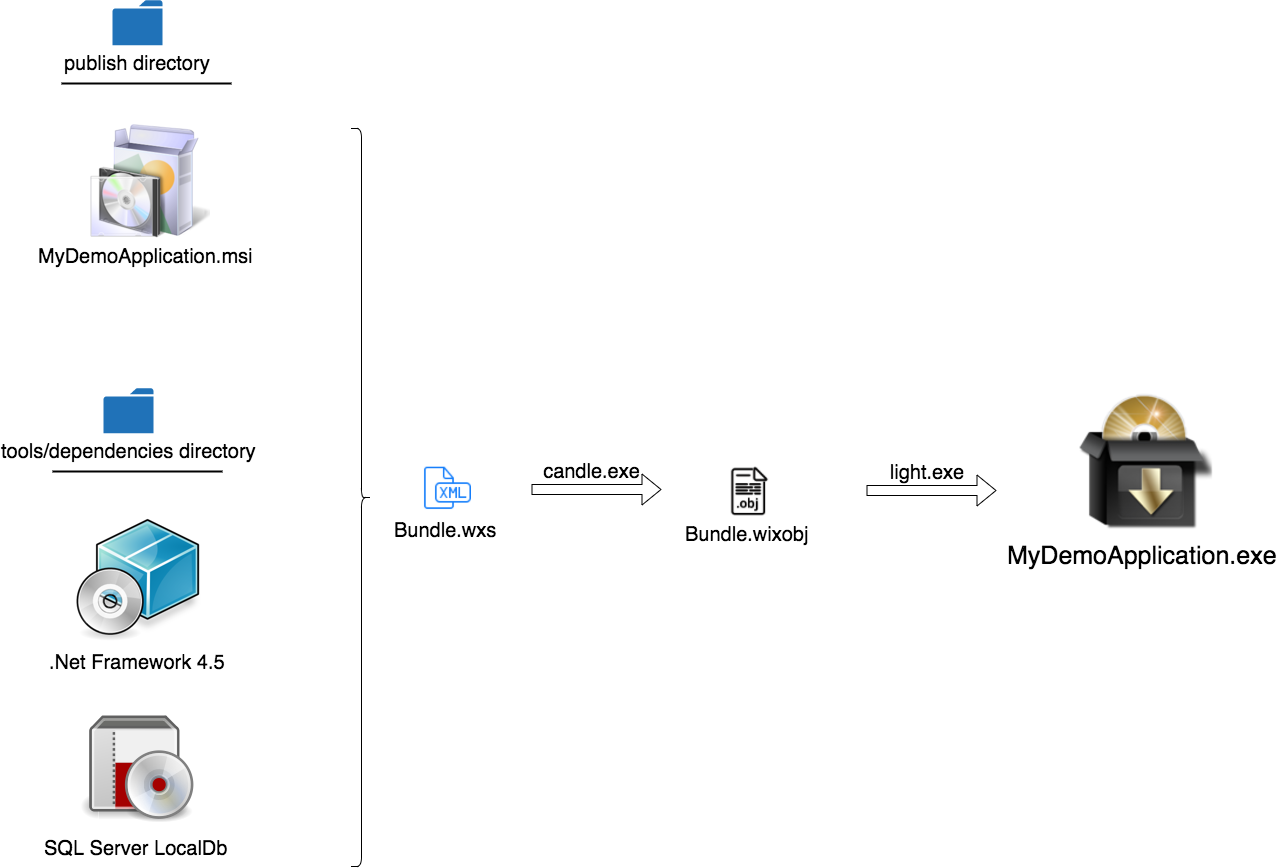
Step 7. Create a bootstrapper application that chains the dependencies required for the installation
At this point we have a working .msi installer that installs the app and runs custom actions. But what if our app requires the user to install some 3rd party dependencies on their machine - e.g. the .Net Framework - but we don’t want them to go through the trouble? Let’s see if we can check if the dependencies are installed, and if not, install it as part of our app’s installation process.
WiX has a special type of project for this; called a Bootstrapper project. Just like the WiX setup project had a Product.wxs core config file, a bootstrapper has a core config file called Bundle.wxs. Compiling and linking it results in an .exe file. It chains a sequence of installations into a single process - including our app’s .msi as well as any other 3rd party installers. If anything fails in the chain, everything will be rolled back.
Let’s kick things off by creating a Bundle.exe template using the Visual Studio Wix Toolset. Like before, we will use this just to create the base template. After that everything is done by hand.
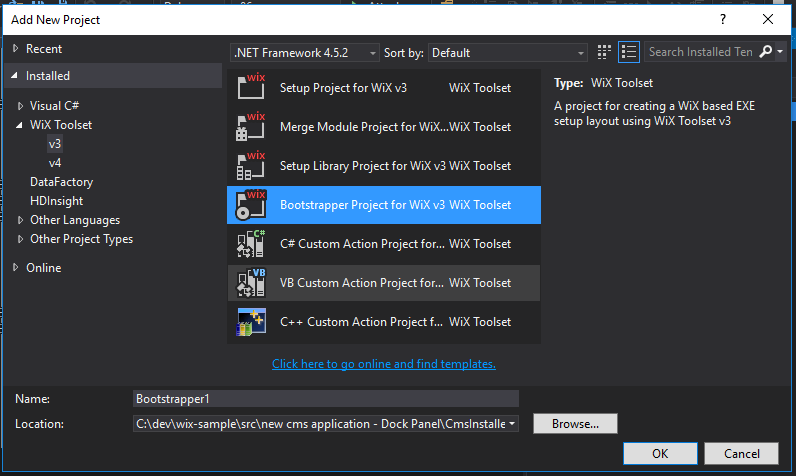
First off, create a new Visual Studio project (File > New > WiX > Bootstrapper project.) This will create a template called Bundle.wxs, which looks something like this:
Read through the sections of the Bundle.wxs file. Understanding the sections should be simple by now: the Chain node defines which packages are installed, and in what order. Then, each package is defined in its own PackageGroup node. You can have ExePackage, MsiPackage, and several other package types. You can also, if you prefer, add branching conditions that will be checked to determine which package to run (e.g. 64-bit v/s 32-bit versions of a package.)
Next up, download the .exe or .msi (or whatever) installers for all the dependencies that you want to bundle in with your app; and put them in your tools/dependencies directory. Yes, they are going to go into your version control system and will increase the size of your installs. Standard procedure is to organize the directory structure like this: tools/dependencies/software/os/version
Then add references to those installers in your Bundle.exe file, along with any conditional checks you want to add. Here’s what my final version of the Bundle.wxs file looks like:
Finally, we’ll use the Candle and Light tools to compile our bundle into a single .exe file. I created a new psake task, here’s what it looks like:
And there you have it! It was painful, it took a long time, but at the end we have an installer that is:
- generated automatically with a single command-line command (“build bundle”)
- can be incorporated into a CI/CD process using the above command
- automatically updates as you modify your solution (anything in the src and database directories gets automatically harvested and included into the installer.)
Got feedback? Comments? Questions? Feel free to comment below.